Saturday, December 31, 2016

Candy Pocket Treat

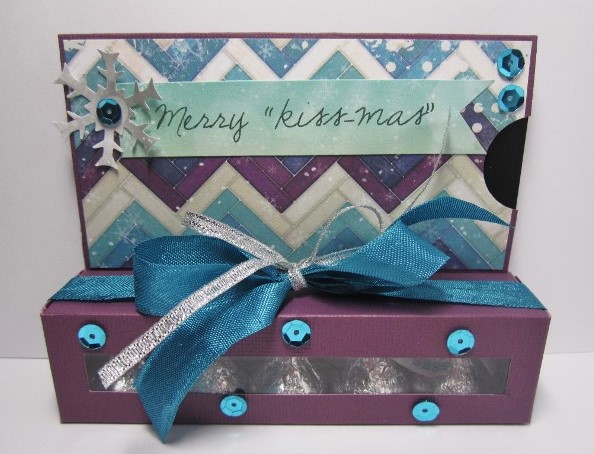
For the month of December, Tombow sent me and the other team members a package of Adhesive Dots. I have used these before and love how strong they are. For this month's project I used the dots to adhere the snowflake to the medallion and the medallion to the pocket. We made these at our December Ladies Night Out with 33 ladies attending. They all loved the project and L♥VED the Tombow adhesives that were used. (also Mono Multi Liquid Glue)

The Adhesive dots are colored which is perfect for seeing exactly where you need to place them. They fit the punched snowflake center perfectly.

Here is a card my great niece made using Tombow's Irojiten's Colored Pencils and 3 Adhesive Dots with glitter rubbed over them.
I am entering the candy pocket in DL.ART's Thankful Thursday Anything Goes Challenge 

Wednesday, December 28, 2016

Happy Birthday Aaron!

not very good photos, but birthday pics of Aaron's 22nd bd and first InstaPot cheesecake.


cheesecake recipe (I used peanut butter oreos)

Thursday, December 15, 2016

Book Review: For the Record

For the Record by Regina Jennings is the latest book I've read from Bethany House.
Cover Art

Betsy Huckabee is from Pine Gap, Missouri, a tiny town in which she lives with her aunt and uncle and works for her uncle's newspaper. Betsy writes articles trying to capture attention from someone in the bigger cities. No one is taking her seriously and she is getting frustrated. She comes up with an idea to write a series of articles for a big city newspaper about a story she has created herself with the new sheriff in town as inspiration.

The antics between Betsy and the sheriff (who has issues all his own) cracked me up and kept me reading til the end without too many breaks.

This is the 3rd book in Regina Jennings Ozark Mountain Romance series, but the author did a great job in writing that this really can stand alone. However, after reading this, I would really like to read the first two now.


**I received this book for free from Bethany House in exchange for my honest review.**

Wednesday, December 7, 2016

Recycled for Christmas

I bet you are all shocked! Four posts in four days! LOL

Today I am sharing a project I made for this week's Cutting Cafe challenge. Regina challenged the design team to create a project using a jar/tin/recycled container. Oh how the ideas flowed and I had ideas for jars and tin cans and then I remembered I have over 100 of these in the basement. My mom buys LOTS of peanuts (because dad loves peanuts and she makes salted peanut rolls) and fruit that comes in these containers. Knowing that I like to make something out of containers like this and I was looking for something to use for a camp craft, she's been saving these for me for a couple years.

I finally got around to actually doing something creative with them. We have used them for freezing our apple cider and I like to use them for tea bags, hot cocoa mix, chex mix, crackers, etc and have them sitting out esp when the kiddos come home. Now after decorating ONE, I can't wait to do some more. This time, I will have a fun coordinated set for the Christmas goodies I have around when the kids come home.


As you can see in the first photo, the lids are blue. I spray painted the top and sides only with a hammered metal paint. I also had a hammered brown, but I think next time we go to the city, I will see if I can find a black and switch out lids. What do you think? Think black would look better?

So, for the deets...I used Cutting Cafe's 3D Christmas Tree Set and resized them to fit the panel I had cut for the front of the container. Then I just inked them with PaperTrey white ink and adhered them with Tombow's Mono Multi Liquid Glue. I wasn't sure what adhesive to use to adhere the whole thing to the plastic container, but tried the Mono Multi and it worked perfectly.

Be sure to visit the Cutting Cafe Blog on the 7th and 21st of every month to see the design team's projects in which you can leave a comment to be entered into a drawing to win 3 FREE sets of your choice from the online store.

Tuesday, December 6, 2016

Visions of Sugarplums ~ Day 3

This has been so much fun creating for Lori's VOSP. I hope that you have been inspired and have taken a chance to win some great prizes. If you are here from Greta Hess' blog, you are in the right spot. If you happened upon my blog, be sure to start at Lori's blog so as to not miss all the wonderful inspiration.

Today is the last day of the hop and I have a combo gift card/candy treat project to share with you today. I was inspired by 2 different youtube tutorials on how to make these. I created the size according to BJPeters channel and the tips from Dawn's Stamping Thoughts.

The pretty designer paper is from Bo Bunny's Altitude collection and the solid is from a company I used to design for that is no longer in business. The sentiment I typed and printed myself.

The black that you see where the notched end is on the right is the gift card. It fits right inside.


Here is a closer look at the Hershey Kisses inside. Five fit perfectly.

Challenge Info:  The challenge is to create a project with a Christmas/Winter theme. You can go and get the details on how to enter HERE.   The prize is $25 gift certificate to Freckled Fawn.  

Here is a list of the companies who are giving prizes:
The Cutting Café :   Orange You Cute Kit
Paper Sweeties:  $25 gift certificate
Lawn Fawn:  $25 gift certificate
Pretty Pink Posh:  $25 gift certificate
The Funkie Junkie Boutique:  $25 worth of new Tim Holtz Christmas Idea-ology Products
Birch Press Design:  $20 gift certificate
TheTwinery:  Sample Pack

And here is a list of everyone playing today. Be sure to start with Lori's (our host) blog as all the details on how to enter for prizes and play along in the challenge is on her blog. Leave a comment on each blog as well. Every time you comment, your name gets entered for the prizes. 

Thank you for stopping by and for all your kind comments the last couple of days. Now it's time to head over to the super talented Lisa Bzibziak.

Here is a list of the designers posting today.
Debbie Fisher {you are here}

Monday, December 5, 2016

Visions of Sugarplums ~ Day 2

Welcome back to day 2 of Lori Hairston's Vision of Sugarplums blog hop! WOW! Wasn't yesterday's hop full of fun and inspiration?! If you came here from Greta Hess' blog, you are in the right place. If you are starting here, be sure to go to Lori's blog and get all the information you need to enter the wonderful prizes she has available.There are prizes for commenting and prizes for participating in her Christmas/Winter challenge.

Today's post is a fun gift to give that has a personal touch. I like to crochet dishcloths and try to have several on hand for when I need a little something. A few weeks before Thanksgiving, Bath and Body was having a HUGE sale and I ordered some fun scented hand soaps to go with my crocheted dishcloths to give as gifts as I need them.

I do a very simple dishcloth after trying several patterns. I found that if I crochet 27 and then half double crochet until it is square, I can get two dishcloths from one skein of cotton yarn. This variegated colored yarn went perfectly with this sun ripened strawberry soap.


Challenge Info:  The challenge is to create a project with a Christmas/Winter theme. You can go and get the details on how to enter HERE.   The prize is $25 gift certificate to Freckled Fawn.  

Here is a list of the companies who are giving prizes:
The Cutting Café :   Orange You Cute Kit
Paper Sweeties:  $25 gift certificate
Lawn Fawn:  $25 gift certificate
Pretty Pink Posh:  $25 gift certificate
The Funkie Junkie Boutique:  $25 worth of new Tim Holtz Christmas Idea-ology Products
Birch Press Design:  $20 gift certificate
TheTwinery:  Sample Pack

And here is a list of everyone playing today. Be sure to start with Lori's (our host) blog as all the details on how to enter for prizes and play along in the challenge is on her blog. Leave a comment on each blog as well. Every time you comment, your name gets entered for the prizes. 

Now it's time to head over to the super talented Lisa Bzibziak.

Here is a list of the designers posting today.
Debbie Fisher {you are here}

Sunday, December 4, 2016

Visions of Sugarplums ~ Day 1


Welcome to the first day of Visions of Sugarplums hosted by Lori Hairston! I am honored to be playing along with some very talented designers. This is a 3 day event filled with lots of inspiration and prizes along the way. Be sure to read to the end to see how you can enter to win.

I am going to be posting all 3 days and to kick it off I have some fun stocking stuffer ideas. While I was laid up for 6 months and unable to walk for 3 of those, I did a lot of youtube watching and found some fun ideas to create. One of my favorite youtubers to watch for crafty ideas was lyriclover810. I created these first two items from her tutorials here and here.

This first one is a hot cocoa pocket with a straw stirrer. How cute is that? It is so simple. Just take a long business sized envelope, seal shut, cut at 4" from each closed short end and cover with designer paper. I added a ribbon and mini tag with a punched snowflake and sequin.

This is a mini Hershey pack. You can click on the link I provided above to see lyriclover810's tutorial


She also shows how to make a nugget pack here, but I made mine fit on a "tray" and got the inspiration from several sites on Pinterest.

and then some covered mini notepads. I've been making these for years. They are the perfect little gift to have on hand when you need a little something to give.


Challenge Info:  The challenge is live right now. You can go and get the details on how to enter HERE.   The prize is $25 gift certificate to Freckled Fawn.  

Here is a list of the companies who are giving prizes:
The Cutting Café :   Orange You Cute Kit
Paper Sweeties:  $25 gift certificate
Lawn Fawn:  $25 gift certificate
Pretty Pink Posh:  $25 gift certificate
The Funkie Junkie Boutique:  $25 worth of new Tim Holtz Christmas Idea-ology Products
Birch Press Design:  $20 gift certificate
TheTwinery:  Sample Pack

Here is a list of everyone playing today. Be sure to start with Lori's (our host) blog as all the details on how to enter for prizes and play along in the challenge is on her blog. Be sure to leave a little love along the way on each blog as well. The names chosen for the prizes come from the comment section on Lori's blog.


Thursday, December 1, 2016

Sock Monkey Baby Shower

This small and intimate baby shower was sock monkey themed. My camera was acting funny and I had a hard time getting good pictures. I have no idea what was going on, so I apologize for the bad photos.

I created this quick and simple invitation using a colored image from Dollar Graphics Depot.

the hydrangeas had 'died' to a perfect brown for this theme of red and brown and someone i knew had this adorable old sock monkey that her grandma had made that she let me borrow.


i found these cute paper plates from Walmart!

i wasn't as impressed with Walmart's brown table coverings however. They were very thin and wrinkly.
 
 for dessert we served banana bread/bars, banana pudding, and monkey bread. i made the food signs using a cut file that i will link below


sock monkey graphic

sock monkey cutting file

sock monkey paper plates (they were a lot cheaper when I bought them)

Wednesday, November 30, 2016

Apple Doodle

For my Tombow project this month we were challenged to use their new Beginner Lettering Set. After many attempts to try to make something even closely resemble lettering, let's just say I think I need the "pre-beginner" set. LOL But in the kit were a couple of dual brush pens (obviously meant for lettering) that I could use and 2 fine tip pens, with one of them having a different tip on each end.

So I needed to come up with something and lettering wasn't going to be it, although I would LOVE to take a lettering class and have someone really help me learn this technique. Adult coloring books are all the rage now and I found this lovely zentangle apple on Pinterest as a free printable...

So I decided to color with Tombow's Irojiten Colored Pencils, Dual Brush Pens (I like to use the brush pens over the pencils for shading), the gray N75 that came in the kit for some shadow work and the finest of the calligraphy pens that was in the set they sent me, to do some doodle work around the colored image piece.

I also used Mono Adhesive Dots to adhere the panel pieces to the card.

Visions of Sugarplums Coming Soon

I'm exited to be playing along again this year with Lori from Choux Choux Paper Art and a great group of designers that she has planned for this year.

visionsofsugarplums-announce-2016

Sunday, November 20, 2016

Cutting Cafe Gable Boxes

This week on Cutting Cafe is free week, meaning we can use any files we want for our challenge. I chose the Gable Box Template and Cutting File again as I had so much fun creating with it last time and I was wanting some boxes for treats for the upcoming holidays.

Because I chose fun patterned cardstock, I  used the no window option on all the boxes below. The first 3 are using the small box option.

I just love this designer paper. I think I will make a tag that says "from our house to yours" and fill with some homemade candy.


This snowman box is created from the large box option. You cut 2 boxes and then adhere them together at the sides to create a large box. 

Here I have taken a picture with the small and large box by each other so you can see the size difference.

Be sure to visit the Cutting Cafe Blog on the 7th and 21st of every month to see the design team's projects in which you can leave a comment to be entered into a drawing to win 3 FREE sets of your choice from the online store.

Sunday, November 6, 2016

Peppermint Gable Box

Can you believe it is only a few weeks until Christmas? I've really struggled with the time sneaking up on my this year since I was laid up with an injured ankle that refused to heal for several months. But regardless, Christmas will be here soon and Regina's challenge for the DT this week was a perfect chance to create some fun boxes for goodies for friends and family.
The Gable Box Template and Cutting File comes with assorted window options or no window as I have done here. Regina has the files so that you can cut 2 large pieces to put together to make a large box or one whole piece on one sheet of 12" x 12" (which is created so that you can cut 2 boxes out at once).

I cut 3 pieces for the bottom and glued them together to make a strong base to hold whatever I put inside. I'm thinking some peppermint Hershey Kisses or Ghiradelli chocolates would be a fun treat. Maybe some peppermint tea too.
Because of the thickness of my bottom piece, I put it to the inside and glued the flaps to it, rather than gluing it to the bottom of the flaps.

 I went with an all red and white peppermint theme and used the smaller box file. This box measures 3" wide x 2.5" deep x 3.5" tall. While I had my Silhouette out, I cut several boxes with different Christmas cardstock (both large and small), so I will be showcasing those later as I get them all decorated.

Be sure to visit the Cutting Cafe Blog on the 7th and 21st of every month to see the design team's projects in which you can leave a comment to be entered into a drawing to win 3 FREE sets of your choice from the online store.

Thursday, October 20, 2016

HOPE

October and November are cancer awareness months and the Cutting Cafe design team is creating projects reflecting cancer awareness. Regina challenged us to create any project using files from THIS link. I chose to create a project for Breast Cancer Awareness. I'm sure there are many of you who this has affected either personally or a friend, neighbor, family member, etc.

I chose 2 files from the list to create this card.
Breast Cancer T-Shirt & You Gotta Have Hope Printable Stamp Set


I used Tombow adhesives for adhering all the pieces.

Be sure to visit the Cutting Cafe Blog on the 7th and 21st of every month to see the design team's projects in which you can leave a comment to be entered into a drawing to win 3 FREE sets of your choice from the online store.

Wednesday, October 12, 2016

Rubber Ducky

This is what I made for shower invitations that was a rubber ducky theme. I did not put on the shower, was just asked to make invites for it.

I made 40 of these using My Scrap Chicks' Rubber Ducky A2 Easel Card cutting file. I made these into postcards rather than an easel card.

I used Tombow's Mono Multi Liquid Glue to adhere all the pieces except for the eyes. Tombow has a Mono Glue Pen that is perfect for gluing tiny pieces or intricately cut pieces that would be hard to use other adhesives on.

Book Review: The Wish


The Wish by Beverly Lewis is the latest book I have received from Bethany House. I love B. Lewis' writings and have read almost all if not all of the books she has written.

This is an Amish story (one of my favorite genres to read) and is about an Amish girl Leona who befriends Gloria when they move next door and they become best friends. Gloria's family moves in the middle of the night and Leona doesn't hear from her friend for years.

Then one day she receives a letter from Gloria and finds out the family has left the Amish faith and Gloria is needing to see Leona. Leona decides to go visit Gloria, but her fiance is worried that she might not come back, esp since Leona dated Gloria's brother briefly before the family left.

While I liked reading this story, it didn't seem to move as smoothly as the other books I have read. I didn't feel like it was one of Beverly's best writings, but will still look forward to reading her new book that comes out in April of next year.

**I received this book for free from Bethany House in exchange for my honest review.**

Saturday, October 8, 2016

BFB The Angel of Forest Hill


The Angel of Forest Hill by Cindy Woodsmall is the latest book I have received and read from Blogging for Books. I love all the books I've read by C. Woodsmall, so had a pretty good feeling about this one as well and I wasn't mistaken. There are even 2 recipes shared that you can try.

This book is an Amish Christmas romance story about Rose and Joel. Joel's wife dies after giving birth. It is an Amish custom for someone from the community to help out, but because it is so small, they seek help from another community and Rose, the only girl of 12 children is sent. In order for Rose to live in the house and help out, they must marry and their marriage is one of convenience.

Not only does she marry a man she doesn't know, but now Rose has 3 small children and a home to care for. She came from a family that wasn't kind to her and is looking for kindness and love. Joel is grieving the loss of his wife. As time goes by Rose begins to have strong feelings for Joel and then a new beautiful widow comes to the community and among misunderstandings, Rose's heart is broken again.

This story is one of love and forgiveness and understanding. It is a small book and can easily be read in a day. Once you start, you won't want to put it down.

 I received this book from Blogging for Books for my honest review.I received a copy of this book from Blogging for Books and this is my honest review.
I received a copy of this book from Blogging for Books and this is my honest review.

Thursday, October 6, 2016

Corn Candy Milk Carton Box

I'm back with a project for this week's Cutting Cafe challenge. I was sick and missed out on the last challenge, so it's been awhile since I've done anything creative.

Regina challenged us with our choice of two files: 
Halloween Fall Milk Carton or
3 Halloween Treat Cup Cards

Both are such fun files to work with. I chose the first, but also chose to include the file Candy Corn Trio Shaped Card Template. I did this, because I wanted to try and make a Corn Candy Milk Carton.

To create this box, I just opened one of the milk cartons and in Silhouette, erased the shaped lines and then copy and pasted one of the candy corn images from Candy Corn Trio Shaped Card Template and pasted and centered it where the other image was.


I cut a piece of orange designer paper to fill the opening and then adhered the top and bottom pieces to the orange piece. I made a "belly band" to fit around the top to hold it closed and then added some orange and black twine with a sentiment.

I used Tombow's Xtreme Adhesive to glue the box shut and Mono Glue Stick to adhere the panels to the box and candy corn pieces to the orange panel.
I'm really liking how it turned out. These are so quick and easy to create, that you could make several of them in no time. Just curious....do you say Candy Corn or Corn Candy? For some reason in our family it was Candy Corn.

Be sure to visit the Cutting Cafe Blog on the 7th and 21st of every month to see the design team's projects in which you can leave a comment to be entered into a drawing to win 3 FREE sets of your choice from the online store.